Monday, March 12, 2012

A taste of summer

Meep talked me into buying some blueberries at Sam's Club last week. They were really good, but we couldn't eat them all. So I decided to make a blueberry crisp. Hubby said I should throw some raspberries in there, too. Genius. Especially since our raspberry bushes are currently still covered with more than 3ft of snow. I can't wait until summer. Raspberries, rhubarb, mmm.
But I digress. I have yet to find a crisp recipe that fulfills my (admittedly) picky nature. I want the fruit bubbly and gooey, and the crisp, well, CRISP! Crisp, but buttery and melty.
This time, I used a recipe that I found on a blog called Our Family Attic.
Here are the lovely fresh blueberries, and thawed raspberries (which were picked out back and frozen last summer).


Aren't they pretty?


And with the topping.


Andddddd, the finished product!!!


I really like the topping in this recipe. It gave me the consistency that I was looking for! Yum! The only thing missing, sadly, was vanilla ice cream. We didn't have any. :(


Lost and found.

The Great Disappearing Necklace has been found!


Friday, March 9, 2012

Ch-ch-chango Bars!


In school, my twins just finished reading "Jalapeno Bagels" by Nastasha Wing. The book is about a boy with Mexican and Jewish heritage, whose parents own a bakery. The story is based on a real bakery in Arcata, CA, called Los Bagels. You can order off their website. Check it out!
The book contains two recipes, one of which is for Chango Bars. What is a Chango Bar?
Basically, it's a blonde brownie with chocolate chips and tons of nuts.
My boys brought home their class newsletter, which had the recipe. They begged to make them, especially since the recipe called for one of their favorite ingredients: chocolate chips! My boys don't like nuts, though, so we left them out.
They are super yummy. Everyone likes them except Meep, who isn't big on the chocolate chip cookie-like thing anyway (though choco. chips themselves are another story).
Since the recipe is readily available on the internet, and is printed in the book, I feel comfortable sharing it:

1/2 Cup butter
1/2 Cup margarine (though I used all butter, see my post about butter,)
2 Cups brown sugar
3 eggs
2 1/3 Cups flour
1 TBSP baking powder
1 tsp salt
1 Cup chocolate chips
1 cup mixed nuts

Melt butter and marg. While this is melting, cream brown sugar and eggs, then add melted butter and marg. Combine flour, baking powder, and salt, and stir into sugar mixture. Fold in chocolate chips and nuts. Pour mixture into greased 9x13 pan, and bake 45-50 minutes at 350 degrees.
*This recipe is from the story
Jalapeno Bagels: Houghton Mifflin Reading

Like I said, we left out the nuts because the kids don't like them. But I think they would be even more awesome with the nuts.

My food philosophy.

I've mentioned that I have 4 children. 4 rather small children: 9, 8, 8, and 4. With that number of children, cooking a meal that ALL of them like is a challenge. I'm not alone. I hear other mother's talk about the lengths they go to get their children to eat vegetables/fruit/meat/ whatever. They plead, they bribe, they make bargains, they threaten, they put their foot down.
I refuse to make an issue out of food. I did in the past. When my oldest was a toddler, he went on a fruit/vegetable fast. Refused to eat any type of fruit or veggie. As a first time mother, I was frantic. I tried everything. After ending up in my in-laws bedroom, trying to force a hysterical 2 y/o to eat carrots (which he then gagged up), I thought, What am I doing? What is the purpose of this? Why am I putting him (and myself) through this?
So I stopped. I kept offering him fruits and veggies, putting them on his plate at every meal. I made sure he took a multivitamin. This went on for a year. Yes, a year. Then one day, he ate the broccoli I put on his plate. And he wanted more. And more. And more.

We have rules, though. I will NOT make 2 different dinners. I make a main protein, a side (rice, noodles, potatoes), and at least one hot veggie. Then I put out salad, and raw veggies - broccoli, carrots, celery, and sometimes fruit. They have to have at least one. This makes no extra work for me, and gives them a choice. Voila! Veggie problem solved. We do ask them to try a different veggie now and again. And I'll often make an additional veggie if I know they don't like the one I'm making (all 4 hate green beans in any shape, form, or container - always have).
My oldest and youngest don't like red meat. In fact, my youngest doesn't care for meat much at all. That's ok. I don't make red meat often.
We eat fish quite often, since we usually catch and freeze a lot in the summer. Eldest likes fish. Youngest not so much.
Another rule is that they are not FORCED to eat anything. But if they don't, there are consequences. If they don't eat some protein, no seconds on anything else. Same with veggies. If they choose not to eat at all, no dessert, and no snack. If they are hungry later, they can heat up some dinner, or have fruits or veggies (always allowed).
There are times when I will make an alternative protein available, if I'm making something I KNOW they all don't like. Usually, though, it's a twist on the same protein. I made curry one night, but served the chicken (unsauced), rice, and sauce separately. Then we could all have it how we wanted. No extra work for me, and I think at least 2 of them tried it.

This philosophy has worked well. Though there is some pickiness inherent in a couple of them, they are usually willing to try things. Eldest found that he can tolerate brussel sprouts. Older twin discovered that while he doesn't like cooked broccoli, he does like it raw. Youngest won't drink milk, but loves cheese and yogurt. And younger twin...well...he'll eat just about anything. :)

Thursday, March 8, 2012

Hail Mary

This is my 4th year teaching 5th grade CCD at our church. I love it. I love that one hour a week I have with those kids. They are so incredibly awesome, and I try to make lessons as much fun as possible.
One of the highlights of the year is making rosaries. The first time I taught this lesson, I used instructions for making a keychain rosary with plastic cord and pony beads. It was ok.
The next time, I had a wonderful co-teacher who was also a fellow beader/jewelry maker. She put together a wonderful kit that the kids really enjoyed making. Sadly, she moved away, and I'm on my own.
I was determined to find my kids a great project that would be easy enough for the kids who may have trouble, and could be done in an hour with only me to assist all 10-15 kids.
I ended up with plastic/glass bead rosary strung on beading wire, with lovely centers and crucifixes.
This is one that one of my boys made at home. The Hail Mary beads are actually 6mm glow-in-the-dark beads! I thought that was pretty cool, and so did the kids. I had many colors available for the Our Father beads: 8mm plastic beads. The centers are St. Benedict medals. I was pleased to find them, since our church is St. Benedict's. I ordered 2 different types of crosses. My boys thought these fancier ones were better. Also, the other type had jump rings with HUGE splits. When I made a sample, the wire kept slipping through the split.
I ordered the glow beads, centers and crosses from Catholic Parts. They had really nice pieces, and great prices. I will definitely be using them again. The wire and colored beads I picked up at Michael's.

Monday, February 27, 2012

Marshmallow Fondant


Fondant looks so lovely on cakes, doesn't it?

Too bad it tastes like sweet playdough. Ok, ok, that's not fair. It's not BAD, just sweet. And the texture is weird. Like playdough. Or clay. And buttercream tastes soooooo much better. So I don't use it that much. When I found a simple recipe for marshmallow fondant (tastes marginally better than regular fondant, and much cheaper), I jumped on it.
Recipe:

Some marshmallows. Number/amount depends on how much fondant you need.
Put the marshies in a (microwave safe) bowl, and sprinkle with some water. Just enough to dampen them. Then toss them so they are all evenly damp.
Microwave until gooey. This doesn't take long.
Grease up a spoon and stir up the goo.
Start stirring in sifted powdered sugar. Until you can't stir anymore. Then dump it onto a VERY thick pile of powdered sugar. Knead powdered sugar in until you have a smooth, firm dough. Voila. Fondant.

Saturday, February 25, 2012

Everything's better with butter!

I'm sort of a butter purist when it comes to cooking. And baking specifically. Margarine is supposed to be better for (or so they say), but I just don't like to cook with it. I have a tub of it in the fridge, though I'm not sure what it gets used for...grilled cheese sandwiches and mac&cheese, I guess.
A while back I was making cookies, and ran out of butter (oh the HORROR!). So when I made chocolate chip cookies, I subbed margarine. They turned out soft, and kind of cakey. I thought they were pretty nice.
Fast forward. I made oatmeal cookies last night. I use my grandmother's recipe, but they have never turned out like hers. My cookies are good, just not like my grandma's. I decided to sub part of the butter with marg. I usually use 2.5 sticks of butter, which is about 1 1/4 cups (each stick being 1/2 a cup). So I used 2 sticks of butter, and 1/4 cup of marg.
The outcome: the cookies were thin (like grandma's) but got too done around the edges (possibly due to the uneveness of my oven). However! I wasn't able to take them off the pans right away, and they cooled completely on the pans.
What a nightmare! I ended up with cookies stuck ALL over the pans. Even the ones I was able to get to right away stuck. I've never had that problem before. And they broke up really bad, just no structural integrity.
Sorry margarine, but I blame you. I will be sticking to butter for my baking from now on!

PS: The cookies tasted just fine despite this.

Thursday, February 23, 2012

Annnnd more cakes.

This next trio is from Jack and Jeffrey's 6th Birthday.

Jeffrey's Army tank


I think that was a 9x13, with a loaf cake on top. The gun was a Pirouette cookie. The tracks were Hershey Bars. The sand was crushed cookies of some sort. With plastic Army men. I especially love the one holding a candle like a bazooka!

And Jack's cake(s). Originally he wanted the Marine Corps symbol. So I researched to figure out how to do it. I ordered a special mold, and made it out of white chocolate. Then he decided he wanted a beach battle scene. I wasn't about to give up my awesome shield! So we decorated each layer differently.
On the left, Jack's beach battle scene, with crushed cookies for sand. On the right, my Marine Corps symbol, with white chocolate shield coated in gold luster dust. The "water" is just blue frosting smeared on the cake board.

Whooooo lives in a pineapple under the sea?
You guessed it! 9x13 cake. Shoulders, socks and shoes are Swiss rolls. Arms and legs are yellow twizzlers. Tie is a fruit roll-up. Everything else is frosting.

This next one was Luke's 4th Birthday cake.
The truck itself was a frozen buttercream transfer. First time I'd tried that particular technique. You simply lay a piece of wax paper over your image, and "trace" the image with frosting. The you freeze it. When it's frozen, you peel the paper off, and pop it on the cake. It's a great technique. The tires are marshmallow fondant. I'm not a big fan of fondant, and doubt I would ever use it to completely cover a cake. But I do like to use it for accents. It's easy to make, inexpensive, and tastes better than traditional fondant. My recipe is here.

Another use of fondant was on this requested cake. One of my son's friends was having a birthday, and his mom asked me to make a curling cake. Yes, curling. That strange sport that involves stones, ice, and brooms. So, I made a curling cake.
The circles are frozen buttercream. The stones are fondant covered mini donuts, topped with fondant. Nothing too difficult. The big deal on this cake was the actual icing. Swiss buttercream. I had never heard of it, but read about it over at Smitten Kitchen and decided I simply MUST try it. It was fab. But I wanted to smooth it out a little more. So I decided I would set the cake outside for a bit, and let the icing set. It was mostly butter, right? So the cold would firm it up. Well, it was -18 that day. The "bit" I left it out there actually FROZE the icing. When it thawed, the butter came out a bit, so the frosting was a bit yellowed. I'm the only one who noticed, though.
And yes, in the Winter our back deck often becomes an impromptu refrigerator/freezer. One of the perks of living in AK.

More past cakes.


Found these photos lying around. My first creative cake. It's a racetrack, people! This was Ty's 3rd birthday cake. I can't remember what flavor it was. But it was made from 2 9" round cakes, frosted. Then I added some green food color to coconut for the grass. The racetrack is crushed chocolate cookies (I think).


These are super-cute Lego block mini-cakes that I made for Ty's 7th birthday. These went to his class. I made a big cake, then cut it into "bricks", frosted with colored frosting, and stuck little fondant circles on for the dots. VERY time-intensive. But they turned out really cute!


Luke's 1st birthday cake. Very Hungry Caterpillar.
I love this one. I love it so much.


Luke's 2nd Birthday, Elmo fire crew.
My first real carved cake. Oy.
It was about to fall apart!
I still love it, with the Oreo wheels, Twizzler hoses, and gumdrop lights!

Blast from the past!

Ohh, this cake!
This was my first cake for the Wilton class I took in 2008. I still have the pan. I used it to make Ty's Speed Racer birthday cake for his 6th birthday, too.

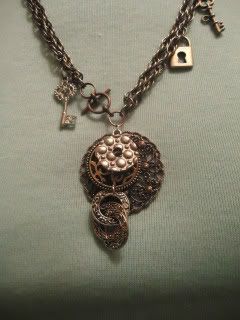
The great disappearing necklace.


I love this necklace. I really do. After this picture, I took off the charms, and just had the center charm cluster. I love it. And I can't find it. It's somewhere in the house, but I don't know where. I will find it, because it's awesome.

Victorian charm necklace.

I like the idea of this necklace. The execution not so much. The second tier pendant didn't have a ring at the bottom, so I added one. But the wire made the necklace catch a little on my shirt, and it was never even. Then one of the rings holding it on broke.
I found some pendants I like better, so I'll probably redesign this one.

Beaded bubbles.


I saw this pattern in a magazine at Walmart of all places. As much as I despise Walmart, they actually have a pretty nice selection of beads and beading supplies. Anyway, I fell in love instantly. Never mind that I have never worked with seed beads. I had to have this pattern.
So I bought the magazine. I ordered the beads from Fusionbeads.com (they are awesome, BTW). I couldn't find the exact colors I was looking for, so I tried to substitute.
I bought the rubber O-rings at Home Depot. Something like $2 for a bag of mixed sizes.
I came across several problems. First, my mixed bag didn't list the sizes of the O-rings. And I couldn't figure out how to measure the rings to match up with the pattern. So I just separated out a small, medium, and large size from the assortment.
And I started beading. I found it to be much easier and less intimidating than I thought. I had to start over once, because I realized I had done the stitch wrong. But it worked up pretty quickly.

My first bubble looked like this.

Remember how I said I couldn't find the exact colors? Well, I needed a 1.5mm periwinkle cube.
I got a 1.5 periwinkle cube, but it wasn't the same kind as the pattern. And I somehow ordered a frosted lavender bead for round 3 instead of a light lavender. Long story short, I didn't like the way this bubble turned out. Back to the drawing board - or beading board in this case.


Attempt number 2:
I made the trip across town to Alaska Bead Company. They are so nice, and offer a 10% Military discount! Yay! On this trip I picked up 1.8mm Miyuki cubes in Lilac. That's what you see in round one of this bubble. Round 3 uses a pretty lavender I picked up on the same trip, instead of the darker frosted bead. I like this one much better. The edging is a bit shaky, but that will come with practice.


And the one I'm currently working on:
Basically the same as the first. I'm really enjoying
this project. I like the stitching of the beads. It feels
like combining several of my loves: beading, sewing,
and crocheting.

Put on a happy face!


When I was crocheting Luke's crown, Ty asked me to crochet him a happy face pillow. The pattern had a yellow happy face on one side, and a blue frowny face on the other. Ty wanted both sides to be yellow happy faces. I was happy to oblige. (See what I did there?)
I rushed to finish it yesterday afternoon, because I wanted to surprise him with it after school. Which means that I just slapped the mouths on there. They need to be resewn correctly.
No matter. He was over the moon. I haven't seen him happy like that in ages.

All hail the King!

King of the Meeps, that is.
I finished the crown I was crocheting for Luke.
I had a heck of a time getting it started. The pattern had a child, small adult, and adult size. Even after going up 2 hook sizes, the child size would have fit a newborn. I ended up making the adult size. With a size K hook.


He took it to bed with him that night.


Happy 8th Jack and Jeffrey!


Coming so soon after the Cub Scout Blue and Gold cake contest, I was exhausted, and feeling discouraged at the thought of having to make 2 more cakes. Thankfully, the boys came up with some pretty simple designs. I cheated this time, and used a boxed cake mix, since there was no structural stability worries.

Jeffrey decided on a pizza cake, which was fun and easy. Just used a 10" springform pan. I iced the cake with a tan frosting. The center was frosted with red to look like sauce. Then, I loaded white/off-white frosting into a bag, and Jeffrey piped it on with a grass tip for the cheese. The "pepperoni" was made with a reddish marshmallow fondant. Red is hard to make. It was more of a brownish pink. So after cutting out the circles, Jeffrey painted them with some almond extract tinted with a little red and brown. Voila! Pepperoni! It looked so convincing of the guests didn't want to eat it at first, because he didn't think pepperoni would taste very good on cake.
I assured him it wasn't real pepperoni.

Jack wanted Kirby. Isn't he cute?
He was made from a 10" springform pan for the head/body. Arms and legs were cut from the loaf cake I had originally made when Jeffrey wanted to make Mordor. Pink and red frosting. Eyes were made with marshmallow fondant, and outlined with black gel icing (Duff brand). Mouth was from the same.